I noticed the Rock Band drum kit had two MIDI ports, one for input and one for output and so I picked up a cheap second-hand kit to experiment with. A quick look online showed several guides to using the drum kit wirelessly and using programs to convert the signal from the USB receiver to a MIDI signal. This all seemed overly complicated and latency inducing for something which already has a MIDI port.
When I first got it set up I was able to use it as a MIDI controller instantly in Cubase, however the LEDs would constantly blink as it tried to connected to the wireless receiver, then it would shut off. Plugging the wireless receiver into a USB port allows the drum kit to establish a connection which stops it from turning off, so that’s what I’ve been doing for now. I then bought a second used kick pedal and was able to use double kicks through the use of a 3.5mm splitter. The weight of this put stress on the drum kit’s 3.5mm port, so I took apart the kit, removed the original 3.5mm port and soldered a female 3.5mm cable directly onto the board. This cable then runs down the back of the kit and allows the heavy adapters to connect on the floor rather than hanging from the back of the kit. There’s another two 3.5mm ports on the back of the kit which don’t seem to do anything. I’m not sure if my second-hand kit is broken, but I’ll be looking into it and seeing if it will allow the connection of extra drum/cymbal pads.
Here’s a guide to using the Rock Band drum kit as a MIDI controller for Addictive Drums inside Cubase, but it should be a similar process for most digital audio workstations like Ableton Live, and other drum machines such as EZ Drummer (Drumkits from Hell etc) and BFD2.
Connect the port labeled “MIDI OUT” on the drum controller to the MIDI IN port on your computer using a standard 5 pin MIDI cable. Next plug the wireless USB adapter into your computer. We wont be using the USB adapter, but it will stop the drum kit from turning off.
In Cubase select “Devices” from the top menu and then click “VST Instruments” (or hit F11), then click one of the empty instrument slots and load Addictive Drums.
Add a new MIDI track and set the input to your soundcard’s MIDI input, and the output to Addictive Drums. Change the map to GM Map (or your own map if you know what you’re doing).

Change your inputs and outputs so Cubase knows to send the Rock Band drum kit into Addictive Drums.
Now when you hit any of the drums you should hear a drum hit. If you’re not hearing anything then go back and make sure you have everything set up correctly. You can check the transport bar at the bottom to see if Cubase is receiving a MIDI signal from the kit (red bar) or if it’s outputting audio (green bars).
-

The red bar shows MIDI activity and the green bar shows audio activity.
As of now you’re ready to go, but there’s still a few more things we can do to make things better.
Open Addictive Drums again and select “Beats” from the top right. Change the map preset to “Empty” in the drop down list and then select “Map Window”.
-

Change the drum map to a blank template to allow us to build our own.
In this window you can change what drum hit will be played when you hit each pad on the drum kit. Hit one of the pads on your kit and the corresponding key on the right will light up orange. Click this key to select it. Now you can select the drum sound you want to use from the top left. Click the drum name you want to use and the different options will appear in the middle of the window. You can click these names to hear them, and then drag the name of whatever you want to use onto the keyboard on the right.

Select a drum on the left, and drag a sound from the middle onto the keyboard on the right.
Repeat this until you’ve assigned a drum sound to each pad.
-

Drum map set up with a drum assigned to each pad on the kit.
The Rock Band drum kit only seems to have 3 different levels of velocity and the lowest is very quiet, so you might want to adjust the minimum velocity level. This will give less dynamics overall, but it will sound better unless you’re a consistently heavy hitter.
-

Adjusting the velocity prevents things from getting too quiet.
You should now be ready to record drums in Cubase. You can go back and change the settings at any time to find something which best works for you.
One problem I’ve noticed is that the kit will sometimes trigger two hits at almost the same time. This may not always be a problem, but if you listen carefully you’ll be able to hear a weird sound of the drum being played twice in rapid succession. Another problem is that the drum kit never seems to turn off the midi note after it has been played. This overloads Addictive Drums and causes it to stop playing sounds correctly during playback. Here’s how to fix both problems.
Earlier, where you selected “GM Map” in the MIDI track settings, change it back to “No map”. Double click your recorded drums to open them in the piano roll window. Hit Ctrl+A to select all the MIDI notes, then from the top menu select MIDI > Functions > Delete Overlaps (mono).
-
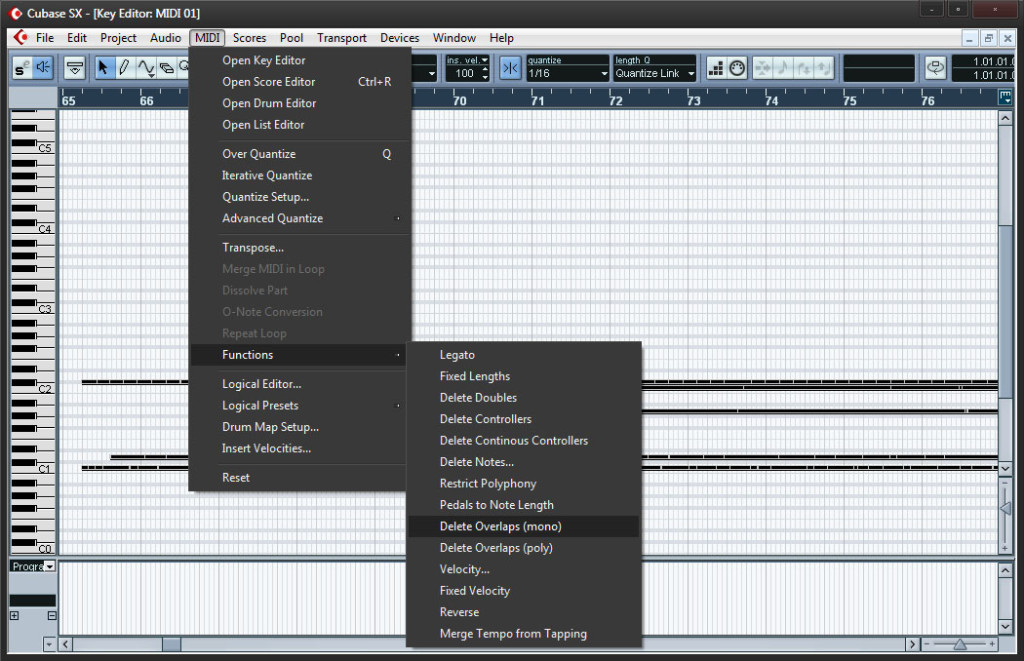
Deleting overlaps will end the current note when the next note begins.

Now do MIDI > Functions > Delete notes. I’ve found a minimum length of 51 is usually fine, but you may need to adjust this if you’re playing something fast. Your drums should now be fixed. There may be a MIDI Insert which does something similar, but for now this is a usable workaround.
-

Delete the short double hits which were created when the overlaps were deleted.
Congratulations! You now have a fully functioning electric MIDI drum kit!
Sometime in the future I’ll be looking into doing something similar with the Rock Band keyboard controller which also seems to have a MIDI port.